HTML 직접 설정
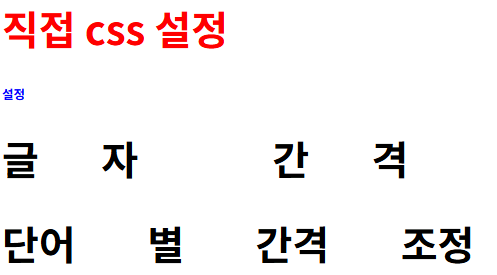
    <h1 style="color:red">직접 css 설정</h1>
    <h1 style="font-size: 10px; color: blue;;">설정</h1>
    <h1 style="letter-spacing: 50px;">글자 간격</h1>
    <h1 style="word-spacing: 50px;">단어 별 간격 조정</h1>
CSS 사용
HTML 파일에서 <style> 태그활용
<head>
    <meta charset="UTF-8">
    <meta name="viewport" content="width=device-width, initial-scale=1.0">
    <title>Document</title>
    <style>
        h2 {color: aqua;}
    </style>
</head>
<body>
    <h2>내부 css 설정</h2>
</body>

모든 h2에 대해 설정됨
css 파일 사용
<!DOCTYPE html>
<html lang="en">
<head>
    <meta charset="UTF-8">
    <meta name="viewport" content="width=device-width, initial-scale=1.0">
    <title>Ex02</title>
    <link href="ex02.css" rel="stylesheet">
</head>
<body>
    <h1>외부 css 설정</h1>
</body>
</html>
태그에 css 링크 걸고, rel에 stylesheet
css 파일 따로 만들기!
h1 {color:skyblue; background-color: gray;}css 파일 내용

id 활용한 css
#div1 {background-color: gold; width: 200px; height: 200px;}#을 앞에 붙이면 id값이 div인 것에만 적용
    <div id="div1">1</div>
    <div>2</div>
    <div>3</div>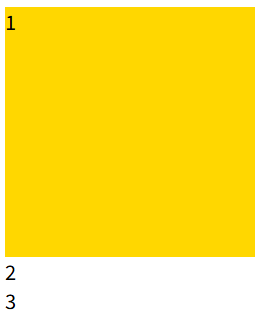
class 활용한 css
.class01 {background-color: khaki;}
.class02 {background-color: pink;}
.[클래스명]으로 클래스명에 해당하는 부분에만 적용 가능
    <div id="div1">1</div>
    <div class="class01">2</div>
    <div class="class02">3</div>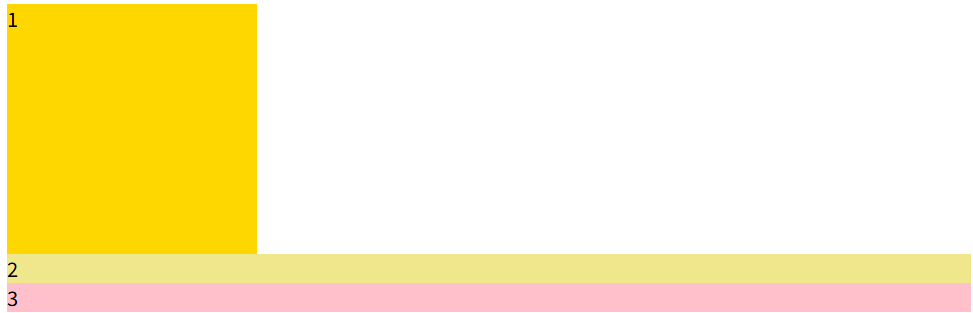
한 번에 여러 개 적용도 가능
#div1, .class01, .class02 {color: chartreuse;}',[콤마]'로 구분하여 작성

여러 개의 속성 한번에 가질 수 있음
<div id="div2" class="class03">id, class 선택자</div>#div2 { width: 200px; }
.class03 { height: 200px; }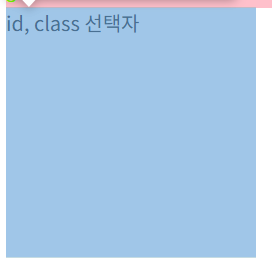
class id 차이점..?
id : 유일한 속성, 또 다른 태그에 동일한 id에 사용하지 않음
class : 여러 개 중복해서 사용
HTML태그에서 한번에 여러 개 적용
#div3 { color: blue; width: 200px; }
#div4 { background-color: aqua;}
#div2 { width: 200px; }
.class03 { height: 200px; }
#div1 {background-color: gold; width: 200px; height: 200px;}
.class01 {background-color: khaki;}
.class02 {background-color: pink;}
#div1, .class01, .class02 {color: chartreuse;} <div id="div3 div4">선택자 여러 개 설정</div>
<div class="class03 class01">선택자 여러 개 설정</div>class는 적용 가능
id는 여러 개 사용 못함

우선 순위
h3 {background-color: yellow;}
.h3{background-color: aqua;}
<h3 class="h3">우선 순위 확인</h3>
class가 tag보다 높다
.h3{background-color: aqua;}
#h3 {background-color: plum;}
id가 class보다 높다
우선순위 : id > class > tag
하위 선택자
#div1 h3 {color: red;}id가 div1인 태그 안의 모든 h3 태그에 적용
    <!--
        하위 선택자
        특정 태그 하위에 있는 모든 값들 적용
    -->
    <div id="div1">
        <h3>h3 자식 1</h3>
        <div>
            <h3>자식 2222</h3>
        </div>
        <hr>
        <h3>h3 자식 1</h3>
    </div>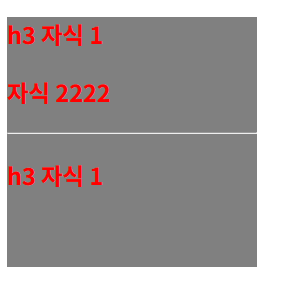
자식 선택자(>)
#div2 {width: 200px; height: 200px; background-color: gray;}
#div2 > h3 {color: green;}
    <!--
        자식 선택자
        특정 태그 직속 자식에게만 적용
    -->
    <div id="div2">
        <h3>h3 자식 1</h3>
        <div>
            자식 1 <h3>자식 2222</h3>
        </div>
        <hr>
        <h3>h3 자식 1</h3>
    </div>
직속 자식인 첫 번째 h3와 마지막 h3만 적용됨
    <div id="div3">
        <div>
            <h3>div->h3</h3>
        </div>
        <div>
            <div>
                <h3>div -> div -> h3</h3>
            </div>
        </div>
    </div>
#div3 {width: 200px; height: 200px; background-color: green;}
#div3 div > h3 {color: aqua;}두 번째 css 설명
id div3의 모든 div의 직속 자식 h3에 적용하라
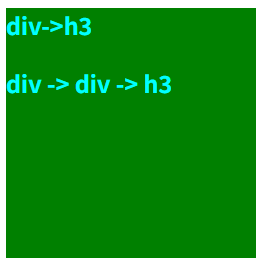
#div3 {width: 200px; height: 200px; background-color: green;}
#div3 > div > h3 {color: aqua;}
id가 div3인 직속 자식 div의 직속 자식인 h3에 적용하라

같은 위치 선택자(~)
    <div id="div4">
        <h3>div4 자식</h3>
    </div>
    <div>div4 형제 및 인접</div>
    <div>div4 형제</div>
#div4 ~ div {background-color: red;}id가 div4인 것과 같은 선(tab)의 모든 div 선택

기존 것에도 적용 됨. 왜? div 위치가 같으니까
인접 선택자(+)
/* #div4 ~ div {background-color: red;} */
#div4 + div {background-color: red;}
#div4와 인접한 것만 적용됨

nth-child(i)로 지정하기
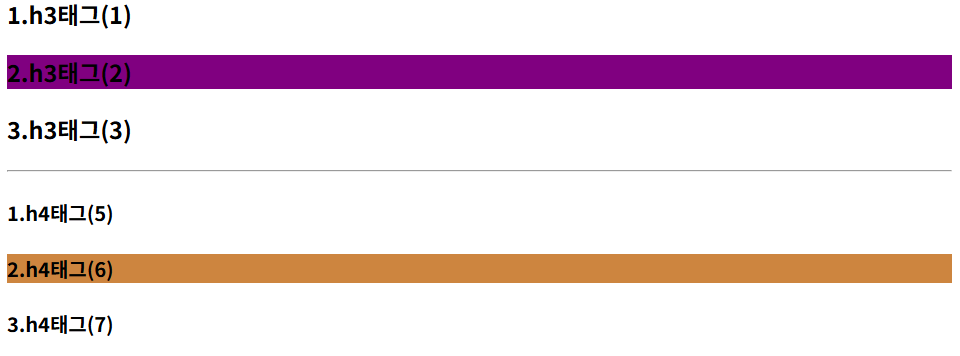
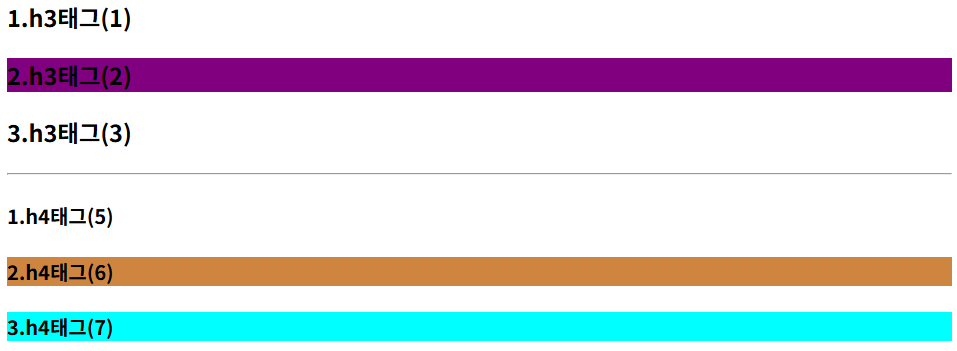
    <div id="div5">
        <h3>1.h3태그(1)</h3>
        <h3>2.h3태그(2)</h3>
        <h3>3.h3태그(3)</h3>
        <hr> <!-- (4) -->
        <h4>1.h4태그(5)</h4>
        <h4>2.h4태그(6)</h4>
        <h4>3.h4태그(7)</h4>
    </div>
#div5 h3:nth-child(2) {background-color: purple;}
#div5 h4:nth-child(6) {background-color: peru;}id가 div5인 자식들 중 n번째
<hr> 도 태그이기 때문에 두 번째 예시는 6이라고 써줘야 적용이 된다.
#div5 h4:nth-child(2) {background-color: peru;}2번째에 h3 있어서 페루 색 적용 안 됨
nth-of-type(i)
#div5 h4:nth-of-type(3) {background-color: aqua;}id가 div5인 태그 안에서 3번째 h4에 적용
전체 선택자(*)
* {margin: 0; padding: 0;}
여백이 없어짐.
바깥쪽 여백 : margin
안쪽 여백 : padding
hover
    <div id="div1">div1</div>
    <div id="div2">
        <div>
            div2
        </div>
    </div>
    <div id="div3">div3</div>
    <div id="div4">div4</div>
#div1, #div2 #div3 {width: 200px; height: 200px; background-color: red;}
#div1:hover {background-color: green; width: 400px;}
#div2 > div {width: 100px; height: 100px; background-color: blue;}
#div2:hover div{background-color: green; width: 150px; height: 150px;}
#div3:hover + #div4 {background-color: green; width: 150px; height: 150px;}
마우스가 해당 부분에 올라가면 hover로 지정한 값으로 바뀜
#div2:hover div{background-color: green; width: 150px; height: 150px;}
id가 div2인 것 마우스 올리면 그 안의 div 설정 값 바꾸기
#div3:hover + #div4 {background-color: green; width: 150px; height: 150px;}
id가 div3인 것에 인접한 id가 4인 것의 설정 값 바꾸기


색상
    <div id="div6">hex</div>
    <div id="div7">rgb</div>
    <div id="div8">rgba</div>
#div6, #div7, #div8 {width: 200px; height: 200px;}
#div6 {background-color: #B2CCFF;}
#div7 {background-color: rgb(255, 178, 217);}
#div8 {background-color: rgba(255, 178, 217, 0.5);} /*불투명도*/
블럭과 인라인 차이
    <div id="div1">div</div>
    <h1 id="h1">h1</h1>
    <span id="span">span</span>
    <a id="a" href="#">a</a>
#div1 {background-color: red; text-align: center; width: 100px; height: 100px;}
#h1 {background-color: gold; width: 100px; height: 100px;}
#span {background-color: green; text-align: center; width: 100px;}
#a {background-color: gray; width: 100px; height: 100px;}
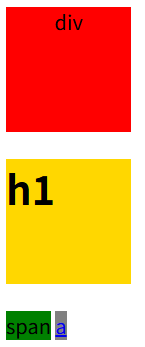
인라인인 span과 a는 이동할 공간이 없어 공간 변경이나 align 등의 효과를 받지 못한다.
display
display : inline / display : block
#div1 {background-color: red; text-align: center; width: 100px; height: 100px; display:inline}
#h1 {background-color: gold; width: 100px; height: 100px;}
#span {background-color: green; text-align: center; width: 100px; display:block}
#a {background-color: gray; width: 100px; height: 100px;}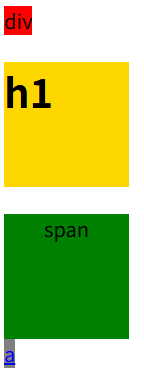
display : inline-block
#div1 {background-color: red; text-align: center; width: 100px; height: 100px; display:inline}
#h1 {background-color: gold; width: 100px; height: 100px;}
#span {background-color: green; text-align: center; width: 100px; height: 100px; display:inline-block}
#a {background-color: gray; width: 100px; height: 100px;}
inline block : block으로 보이지만 inline처럼 쓰겠다

display : none
#div1 {background-color: red; text-align: center; width: 100px; height: 100px; display:inline}
#h1 {background-color: gold; width: 100px; height: 100px;}
#span {background-color: green; text-align: center; width: 100px; height: 100px; display:none}
#a {background-color: gray; width: 100px; height: 100px;}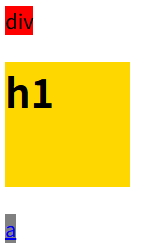
숨겨버림
div의 크기는 부모를 따라간다
크기 지정 안 하면 부모 크기 따라감
#div2 {background-color: gold; height: 100px; width: 100px;}
#div3 {background-color: aquamarine; height: 100px; width: 100px;}
#div4 {background-color: brown; height: 50px;}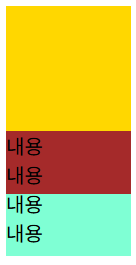
CSS의 '&'
    <div id="div5">
        <div>전자신문</div>
        <img src="image01.jpg">
    </div>
#div5 {background-color: gold; width: 100px; height: 100px; }
img {width: 100px; height: 100px; display: none;}
/*
#div5:hover > img {display: block;}
#div5:hover > div {display: none;}
*/
#div5:hover {
& > img {display: block;}
& > div {display: none;}
}& : (#div:hover) 있다고 생각
#div5 {
    background-color: aqua;
    &:hover {
        > img {display: block;}
        > div {display: none;}
    }
}
 |
 |
hover 전과 hover 후
border
    <div id="div1"></div>
    <div id="div2"></div>
    <div id="div3"></div>
    <div id="div4">
        <img src="image01.jpg">
    </div>
#div1, #div2, #div3, #div4 {width: 200px; height: 200px;}
#div1{border: 3px solid black;}
#div2{border: 3px double green;}
#div3{border: 3px dotted red;}
#div4{border: 3px dashed lawngreen;}
border-radius
#div3{border: 3px dotted red; border-radius: 20px;}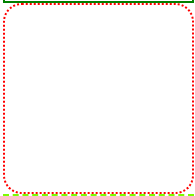
모서리 둥글게, 크기가 width : 200px, height : 200px 일 때, border-radius : 200px이면 원으로 변함
Overflow:hidden
#div4{border: 3px dashed lawngreen; border-radius: 200px; overflow: hidden;}
#div4 > img {width: 200px; height: 200px;}
원 부분을 벗어난 사진을 안 보이게 처리한다
border-bottom
a {color: black; text-decoration: none;}
a:hover{
    border-bottom: 3px solid black;
}
테두리에서 아래쪽만!

text-decoration : none : 링크 만들 때 아래의 밑줄 없앨 수 있음
overflow:auto
    <a href="#">클릭 이동</a>
    <div id="div5">
        <h3>이용약관</h3>
        <div>
            제2000조<br>
            내용이 들어옵니다
        </div>
    </div>
    <hr>
#div5 {
overflow: auto;
width: 100px; height: 100px;
background-color: aquamarine;
}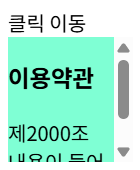
넘치는 영역에 대해 스크롤바가 생기게 됨
Transform, Transition
    <div id="div6">
        <div>
            <img src="image01.jpg">
        </div>
    </div>
#div6 {
width: 200px; height: 500px; border: 1px solid gray;
border-radius: 5px;
}
#div6 div {overflow: hidden; width: 200px; height: 200px;}
img{
width: 200px; height: 200px;
&:hover{
transform: scale(1.5) ; /*위치, 크기 변경*/
transition: all 1s; /* 1초 동안 처리해주세요 */
}
}transform : 위치, 크기 변경
transform: scale(1.5)
1.5배 키우기
 |
 |
hover 전과 hover 후
'IBM AI Agent 3기 > Frontend' 카테고리의 다른 글
| CSS 알아보기(2) (0) | 2025.12.18 |
|---|---|
| HTML 알아보기(2) (0) | 2025.12.16 |
| HTML 알아보기(1) (1) | 2025.12.15 |