W3Schools.com
W3Schools offers free online tutorials, references and exercises in all the major languages of the web. Covering popular subjects like HTML, CSS, JavaScript, Python, SQL, Java, and many, many more.
www.w3schools.com
HTML Tag
Input tag
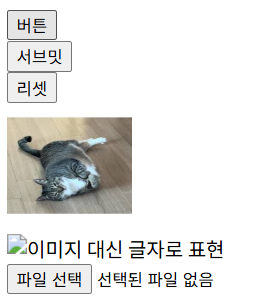
    <input type="button" value="버튼"><br>
    <input type="submit" value="서브밋"><br>
    <input type="reset" value="리셋"><br>
    <input type="image" src="image02.jpg" width="100px" height="100px" alt=""><br>
    <img src="" width="100px" height="100px" alt="이미지 대신 글자로 표현"><br>
    <input type="file"><br>
type : 종류
value : 버튼 안에 들어갈 내용(이미지, 텍스트)
alt : 이미지 관련해서 필수 속성, 이미지 불러오지 못할 때 대체하는 텍스트
    <input type="text" value="내용 입력" size="10" maxlength="10"><br>
    <input type="password" value="123456"><br>
    <input type="email" placeholder="test@test.com"><br>
    <input type="search" value="검색 x"><br>
    <input type="tel" placeholder="010-1234-5678"><br>
    <input type="number" value="1" min="1" max="10"><br>
value : 초기 내용 입력이 됨
placeholder : 내용이 보이는데 입력은 아님, 예시 보여줌
email : 부가적으로 설정할 것들 더 있음
search : text와 비슷한 내용이지만, 우측에 x버튼 있음

    <input type="color"><br>
    <input type="range"><br>
    <input type="radio"><br>
    <input type="checkbox"><br>
    <input type="hidden"><br>
color : 색상 선택
range : 범위 선택
radio : 하나만 선택할 때
checkbox : 다중 선택할 때
hidden : 특정 항목 숨기기

radio
name을 사용해 속성을 통일
    10대<input type="radio">
    20대<input type="radio">
    30대<input type="radio">
    40대<input type="radio">
    10대<input type="radio" name="age">
    20대<input type="radio" name="age">
    30대<input type="radio" name="age">
    40대<input type="radio" name="age">
name으로 속성을 설정해주면, 하나씩만 선택된다.
10대<input type="radio" name="age" checked>
처음부터 체크되게끔 한다.
checkbox
    멍<input type="checkbox" name="hobby">
    겜<input type="checkbox" name="hobby">
    코딩<input type="checkbox" name="hobby">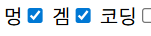
여러 개 선택 가능
radio는 한번 체크하고, 다시 눌렀을 때 해제가 안 되지만, checkbox는 해제 가능
form과 text area, input들
    <form>
        <input type="text" placeholder="input name"><br>
        <input type="text" placeholder="input address"><br>
        <textarea cols="50" rows="5"></textarea><hr>
        <input type="reset" value="초기화">
        <input type="submit" value="서브밋">
        <input type="button" value="버튼">
    </form>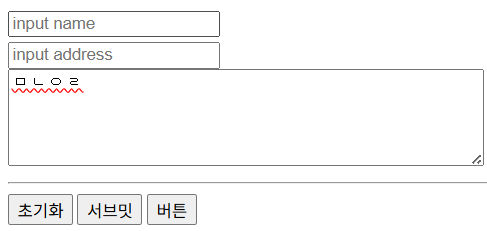
form안에 있어야 reset, submit, button이 연계돼서 동작함
추후에 javascript와 연동해야 함
submit : form 안의 내용들 전송하는 역할, 전송엔 GET(파라미터 사용해서 전송, 사용자에게 노출되어도 괜찮는 파라미터, url에 붙여서 사용), POST 방식 존재
    <form action="https://www.naver.com">
        <input type="text" placeholder="input name"><br>
        <input type="text" placeholder="input address"><br>
        <textarea cols="50" rows="5"></textarea><hr>
        <input type="reset" value="초기화">
        <input type="submit" value="서브밋">
        <input type="button" value="버튼">
    </form>
form의 action : submit 누르면 action 주소로 넘어감, 저기에 만든 api 주소 넣으면 될 듯
    <form action="https://www.naver.com">
        <input type="text" placeholder="input name" name="이름"><br>
        <input type="text" placeholder="input address" name="query"><br>
        <textarea cols="50" rows="5" name="test"></textarea><hr>
        <input type="reset" value="초기화">
        <input type="submit" value="서브밋">
        <input type="button" value="버튼">
    </form>

name을 활용해주면, 사용자가 입력한 값과 매칭이 돼서 주소에 들어가게 됨
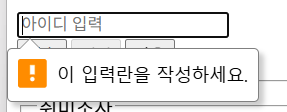
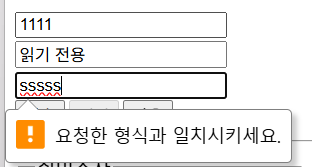
    <form>
        <input type="text" placeholder="아이디 입력" required><br>
        <input type="text" value="읽기 전용" readonly><br>
        <input type="tel" required pattern="\d{3}-\d{4}-\d{4}"><br>
        <input type="submit" value="전송">
        <input type="button" value="이전" disabled>
        <input type="button" value="다음">
    </form>
required : 필수항목
disabled : 누를 수 없음
readonly : 수정불가
required pattern : 입력 형식 강제
select
        <select size="1" name="test1">
            <option value="p1">사과</option>
            <option value="p2">당근</option>
            <option value="p3">코끼리</option>
        </select>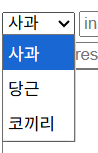
value값이 input의 name과 비슷한 역할을 함
size : 한번에 보일 드롭다운 개수
        <select size="3" name="test1">
            <option value="p1">사과</option>
            <option value="p2">당근</option>
            <option value="p3">코끼리</option>
        </select>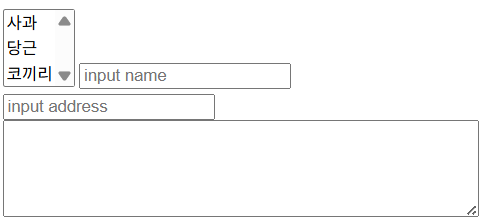
따로 설정하지 않으면 기본 GET 방식
label과 fieldset
fieldset : 테두리가 만들어짐
label : 텍스트 부분을 선택해도 체크박스 체크가 됨(for와 id 일치 시킬 때)
    <fieldset>
        <legend>취미조사</legend>
        <input type="text" id="id"><br>
        <label for="h1">책</label>
        <input id="h1" type="checkbox">
        <br>
        <label for="id">입력</label>
    </fieldset>
button
<button type="button">버튼입니다</button>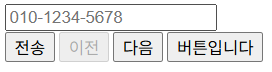
button과 input button의 차이점
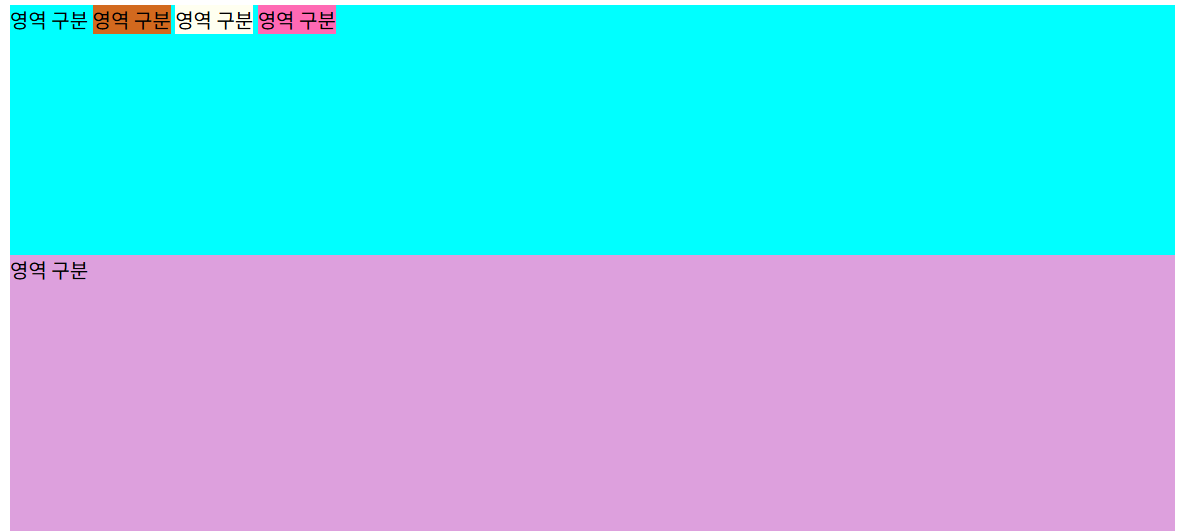
div와 span
    <div id="wrap" style="background-color: antiquewhite;">
        <div id="header">영역 구분</div>
        <div id="main">영역 구분</div>
        <div id="footer">영역 구분</div>
    </div>
    <div id="wrap" style="background-color: antiquewhite;">
        <div id="header" style="background-color: aqua; height: 200px;">
            영역 구분
            <span style="background-color: chocolate;">영역 구분</span>
            <span style="background-color: ivory;">영역 구분</span>
            <span style="background-color: hotpink;">영역 구분</span>
        </div>
        <div id="main" style="background-color: plum; height: 400px;">
            영역 구분
        </div>
        <div id="footer" style="background-color: palegreen; height: 100px;">
            영역 구분
        </div>
    </div>
span은 인라인으로 들어감
섹션
header
머릿글
nav
어느 경로로 바로 갈 수 있게
main
section
article
article
aside
footer
    <header>
        <h1>주 제목이 들어옴</h1>
        <nav>
            <a href="#">공지사항</a>
            <a href="#">회사소개</a>
            <a href="#">이벤트</a>
        </nav>
    </header>
    <main>
        <section>
            컨텐츠 영역
        </section>
        <article>
            주요기사 : 오른쪽 또는 왼쪽 영역에 배치
        </article>
        <aside>광고 : 오른쪽 또는 왼쪽 배치</aside>
    </main>
    <footer>바닥글</footer>
audio
<audio src="audio.wav" controls></audio>controls : 컨트롤러 추가
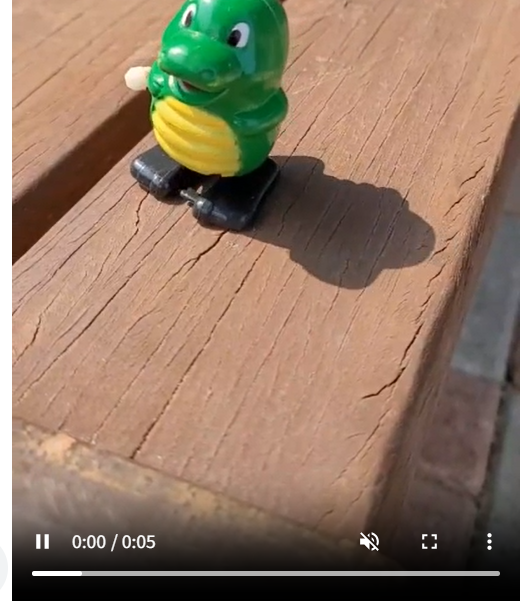
<video src="장난감.mp4" controls loop autoplay muted></video>loop: 무한 루프
autoplay : 페이지 접속하자마자 자동 재생(단, 음소거 상태여야 함)
muted : 음소거
책갈피 기능(name, id, a 태그)
<div>
<header>
<h2><책 갈 피></h2>
<nav>
<a href="#a">[이동 1]</a>
<a href="#b">[이동 2]</a>
<a href="#c">[이동 3]</a>
</nav>
</header>
<main>
<section>
<h3>1번 영역</h3>
<a name="a">1번 영역</a>
<a href="#top">[top]</a>
<hr>
<h3>2번 영역</h3>
<a name="b">1번 영역</a>
<a href="#top">[top]</a>
<hr>
<h3>3번 영역</h3>
<a name="c">1번 영역</a>
<a href="#top">[top]</a>
</section>
</main>
</div>
a 태그의 href #a는 name 또는 id가 a인 곳으로 위치를 이동하게 된다
#top으로 위로 이동한다.
'IBM AI Agent 3기 > Frontend' 카테고리의 다른 글
| CSS 알아보기(2) (0) | 2025.12.18 |
|---|---|
| CSS 알아보기(1) (0) | 2025.12.17 |
| HTML 알아보기(1) (1) | 2025.12.15 |